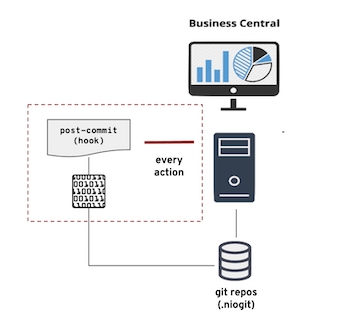
Business Central is a web suite that covers the full lifecycle of business rules and process-based applications from authoring to deployment, management, and track. Business Central stores all data in git repositories, if you want to learn more about how git is handled in Business Central, please take a look on other posts of this series.
Business Central hide a good portion of git complexities of the users, however advanced users do have access to some of those. This post will guide you on how to take advantage of one of the most powerful git features available for advanced users and admins of Business Central: the repository post-commit hook.
Git hooks are a powerful built-in automation tool. Business Central has support to post-commit since May 2015.
First things first
Before we understand how git post-commit hook works in Business Central context, let’s step back and make sure that everyone is in the same page. So let’s create a post-commit hook, and see it in action, using vanilla c git. Here is a step by step shell to follow:
$ mkdir myrepo
$ cd myrepo
$ git init
Initialized empty Git repository in /Users/porcelli/blog/myrepo/.git/
$ touch file1.txt
$ git add .
$ git commit -m "first commit"
[master (root-commit) 0fa1a4a] first commit
1 file changed, 0 insertions(+), 0 deletions(-)
create mode 100644 file1.txt
$ cd .git/hooks/ // (1)
$ echo "#\!/bin/bash\necho Hello World" > post-commit // (2)
$ chmod 755 post-commit // (3)
$ cd ../..
$ touch file2.txt
$ git add .
$ git commit -m "second commit"
Hello World // (4)
[master 3208647] second commit
1 file changed, 0 insertions(+), 0 deletions(-)
create mode 100644 file2.txt
-
Hooks are stored in the bare storage (.git), inside the hooks directory
-
The file has the name of the action: post-commit. Here we have a simple bash script to echo "Hello World"
-
This is a very important step, you need to make sure that this file has executable rights.
-
Here we see the output of our post-commit hook, the "Hello World" message
Post-commit hook for Business Central
Before setup our first post-commit hook in Business Central, let’s first understand what post-commit hook means in Business Central context. The two most important points understand clearly how Business Central executes post-commit hooks are:
-
The post-commit hook is executed as a sync operation, so after every commit, the post-commit will be called, and Business Central will wait until the post-commit hook bash finish.
-
While Business Central waits for the post-commit hook to finish, no other write operation will happen in the repository. We could consider that this is a kind of transaction, it’s even safe (with careful!) manipulate and change repository data or also manipulate history (i.e., squash commits).

Setup a post-commit hook
Based on what we learned in the last section, all you need to do to create a post-commit hook is:
-
Go to .niogit directory and locate your desired repository
-
Inside the hooks directory, creates the post-commit file with your bash script content.
-
Make sure the post-commit file is executable.
Post-commit hook is a powerful automation mechanism, inside this hook you can push changes to different repositories, enforce a backup policy or integrate with the external world.
However, this approach has some downsides. First, you need direct access to the .niogit, what’s not necessarily simple in some enterprises. Secondly, you have to setup the hook for each repository, what may become overwhelming in an enterprise environment.
Important note: you can’t setup hooks using SSH. There are multiple reasons for that, but one important is to avoid the execution of malicious code.
Hook template to the rescue
With the understanding that have access to the .niogit is not always possible, and create post-commit hooks individually in an enterprise environment is complex. There’s also the fact that is very likely that all repositories have a very similar (if not identical) content.
Having these constraints in mind, Business Central provides a mechanism that users can point to a post-commit hook template that, on every new project, Business Central will automatically use it to setup a post-commit hook for the new repository. All you need to do is setup the environment variable org.uberfire.nio.git.hooks pointing to the directory that has the post-commit hook to be used as a template.
Note that this location is used only for template purpose, as the real post-commit hook will be copied from here to every project created. It’s important to understand this difference as if you have references to a path in your bash script, you can’t use relative. Instead you should always use the fully qualified paths; otherwise it won’t work.
Another important observation is that this template is used for all repositories, including the internal system repositories, you can notice it by the amount of the "Hello World" messages in the console during Business Central initialization.
Know limitations
Business Central uses the JGit library to manipulate the git repositories, and there’s a limitation that it won’t work on Windows without cygwin. You can find the opened issue on JGit lib.
Wrapping up
This post is part of a series of posts about Business Central and Git. In this post, we learned about Git post-commit hooks and how to use it in Business Central. This feature opens a world of opportunities for different types of integration, automation backup plans and much more.