Today I am excited to announce the alpha release of the BPMN Extension for VSCode. This is a great achievement and the result of a real cross-team effort - kudos for all involved!
This project started with a very straightforward requirement: run our BPMN editor inside VSCode. However, we learned in a hard way that this wasn’t quite simple as it looked, we had to overcome several VSCode limitations like the ones reported here and here.
The extension provides truly native integration of a graphical modeling editor into VSCode - what’s quite unique as far as I know.
For more information about this release, including how to install, you can find it in this blog post on KIE Foundation blog.
This extension opens a world of possibilities for developers, but for this post, I’ll focus on how this extension plays a key role in the Kogito project. But before exploring how all these things fit together, I’ll first give a quick introduction to the Kogito project.
Kogito: the Next Generation of Business Automation
Kogito, the newest project from the KIE group, is cloud-native business automation for building intelligent applications, backed by battle-tested capabilities.
Kogito is designed from the ground up to run at scale on the cloud. By taking advantage of the latest technologies (Quarkus, Knative, etc.), you get amazingly fast boot times and instant scaling on orchestration platforms like Kubernetes.
The project also goes beyond technology, and it also provides a focus on the domain. It replaces traditional generic API by a domain-based API, avoiding unnecessary abstraction leaks of the underline tools used.
Kogito focus on developers, and this is where the BPMN Extension for VSCode plays an important role. Additional to the extension, Kogito also provides:
-
Tooling embeddable wherever you need it
-
Code generation taking care of 80% of the work
-
Flexibility to customize, only use what you need
-
Simplified local development with live reload
To learn more about Kogito, please visit the kogito.kie.org website. New content is added regularly, so keep an eye for updates.
Quarkus?
Quarkus is probably the coolest thing that happened to the Java ecosystem in a while. Of course, Java has been the technology behind amazing and popular technologies like Kafka, Cassandra and many many other. However, the Java development experience and even the execution itself has been mostly the same. Well… until now.
Quarkus is a game-changer for Java development, here are a few things it provides:
-
Optimized well know standard APIs like JPA and CDI
-
Enhanced developer experience with live reload of changes, similar to script languages like JavaScript or Python
-
GraalVM support that allows producing native binary with small size and memory footprint with incredible load time
Quarkus, the supersonic subatomic Java, is a key piece of infrastructure for Java in the real cloud-native world. To know more about Quarkus, visit the quarkus.io website.
The Kogito Developer Workflow
Back to Kogito, the sample application that we’ll build to illustrate the developer workflow is based on Quarkus with the Kogito extension.
The application entry point is a Business Process that will receive as input a Person object and will invoke a Business Rule to check if the person is an adult or not. If the person is an adult, the process will be done. However, if not an adult, a User Task will be created to handle the child’s case.
Important Note: Kogito is not tied to Quarkus, SpringBoot is also supported. However, by using Quarkus, you’ll be able to get the most of the developer experience (i.e., live reload is not available for SpringBoot) and the ability to generate native binaries that best suit for cloud-native applications.
Step 1: Creating the Project
There is no better way to start a journey for a developer other than in the command line! So open your shell and execute the following command:
The command above creates a skeleton of a kogito intelligent application for Quarkus, and you’re ready to open it in VSCode.
Important Note: Make sure that you have the Java Extension Pack and the BPMN extension installed.
Step 2: Building the Application
The first step in this simple application is to define the Person class, that will be the input for the Business Process:
Next, let’s create a business rule that will evaluate if the input Person object is an adult or not. The person-rules.drl should be created in the src/main/resources/org/acme/kogito directory.
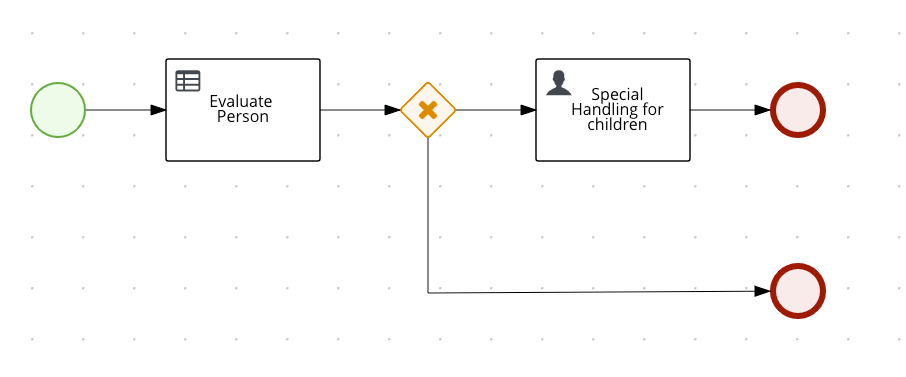
And finally, let’s create the entry point business process, consisting of a start event, a business rule task, an exclusive gateway, a user task, and the end events. This is the receipt to create it:
-
Expand the properties panel in the right-hand side and set the following values in the Process section
-
Name: Persons Process
-
ID: persons
-
Package: org.acme.kogito
-
-
Expand the process section of the properties panel and create a new Process Variable
-
Name: person
-
Data Type: org.acme.kogito.model.Person
-
-
Now click on the start event node on the canvas, a context menu will be displayed with a few icons, and then click on "Create Task".
-
On the new created Task, click and expand the settings item of the context menu (cog icon), and then click on "Convert into Business Rules"
-
On the properties panel of the newly created Task, change the name of the task to Evaluate Person.
-
Expand the Implementation/Execution section and set the Rule flow group field to the rule flow defined in the business rules (in this case
person) -
Expand the Data Assignments section, click on the Edit of the assignment list. Add a new Data input and also a new Data Output, both with the same following values and then hit save.
-
Name: person
-
Data Type: org.acme.kogito.model.Person
-
Source/Target: person
-
-
-
Back to the canvas, make sure you select the Evaluate Person node. On the context menu, select the item "Create Parallel". Select the newly created gateway, click on the settings icon and select "Convert into Exclusive"
-
Select the Exclusive gateway that you just created and click on "Create task" from the context menu. Select back the Exclusive gateway and click on "Create End"
-
Select the new task just created, and using the settings context menu, click on "Convert into User". On the properties panel of the selected User Task, change the name of the task for Special Handling for children.
-
Expand the Implementation/Execution section and set Task Name to
ChildrenHandling -
Click on the edit of the assignment list. Add a new Data input and also a new Data Output, both with the same following values and then hit save.
-
Name: person
-
Data Type: org.acme.kogito.model.Person
-
Source/Target: person
-
-
-
Back to the canvas, make sure you select the Special Handling for children node. On the context menu, select the item "Create End".
-
To finish the diagram, we need to assign the conditions for the exclusive gateway.
-
We’ll start by click in on the line that goes from the gateway to the "Special Handling for Children" node. Now open the properties panel, expand the Implementation/Execution section, select Expression and enter the following:
return person.isAdult() == true; -
Now select the line that goes from the gateway to the "End Node". Open the properties panel, expand the Implementation/Execution section, select Expression and enter the following:
return person.isAdult() == false;;
-
Before closing the file, make sure you save it (menu: File → Save).
Step 3: Running and Interacting with DevMode
At this point you have a fully functional Kogito project! Next step is to run and play with the project!
To run the application, we’ll be back to command line, but this time we’ll use the terminal available directly from the VSCode (Menu: New Terminal) and type:
Now open a new terminal session, that we’ll use to interact with the running application.
Two things to note here, first and the most important: look that we are not dealing with processIds or any bpm leaked API, we’re interacting directly with a business context called "persons". This is the "ergo Domain" mentioned earlier as one of the key points of Kogito.
Next, we check the results of the rest call with the evaluation of the sent Person object with the "adult" property value set to "true" - as defined by the business rule.
To test the power of the live reload, let’s slightly change the business rules and set the adult condition to be greater than 21:
Save the above changes and try to execute the REST call again.
Pretty cool, isn’t it?! The same live reload works for business process changes!
To know more and explore the application API, visit the getting started guide of kogito on the quarkus page. The application we just created is exactly the same as the getting started.
Step 4: Deploying to OpenShift
We now have a running project, and the last step is to deploy this application to the cloud, in this case, using OpenShift.
Kogito provides an operator designed to deploy Kogito Runtimes services from source and every piece of infrastructure that the services might need. Alongside the operator, Kogito also provides a command-line tool that makes the interaction with OpenShift super simple.
For more information about how to install the operator and the CLI check the following README.
I’m running an instance of OpenShift locally using crc, and I already have the Kogito operator installed.
It’s also important to mention that before using the Kogito cli tool, you have to log in to the OpenShift instance using the oc login command as the Kogito cli tool relies on it to communicate with OpenShift.
Before executing the kogito cli tool, we’ll need to push the current source code to a git repository that has to be accessible from the OpenShift instance. In my case, I’m using GitHub.
Now we’re ready to deploy! Let’s start creating a new project using the OpenShift console. I’ll name it kogito-dw-demo, and I’ll make sure the Kogito operator is installed on it.
Next step, I’ll return to the VSCode terminal and from here deploy my Kogito service application using the following command:
And that’s it! You can tail the log executing the following oc command.
Important Note: The current default behavior of the deploy command will trigger a native build, which will take some time.
Once the application is up and running, you can check it on OpenShift console. You’re ready to execute the same REST calls we did before, but now using the deployed service on OpenShift.
What’s next?!
As mentioned before, I’m pretty excited about this release and the world of opportunities that this BPMN extension for VSCode provides.
In this post, I tried to highlight and demonstrate an end-to-end developer workflow experience of a Kogito project how it looks like, and the key role of this extension in the whole story.
This is just the first of a series of innovative releases and blog posts that are coming about the next generation of tooling and business automation.
Stay tuned!